marble countertops

Best Stones for Waterfall Islands in Your Kitchen

Best Stones for Waterfall Islands in Your Kitchen

A waterfall island is more than a countertop with stone on the sides. The material continues vertically from the island surface to the floor. As a result, every vein, edge, seam, and corner becomes more visible. Choosing the best stones for waterfall islands therefore starts with more than colour. You need a surface that suits how your kitchen works and allows for clean, well-planned transitions.

A waterfall design can make a simple island feel intentional and architectural. Poor material choices or rushed fabrication, however, become easier to notice on this type of installation. The right stone depends on the look you want, the island size, your maintenance preferences, and the importance of pattern continuity.
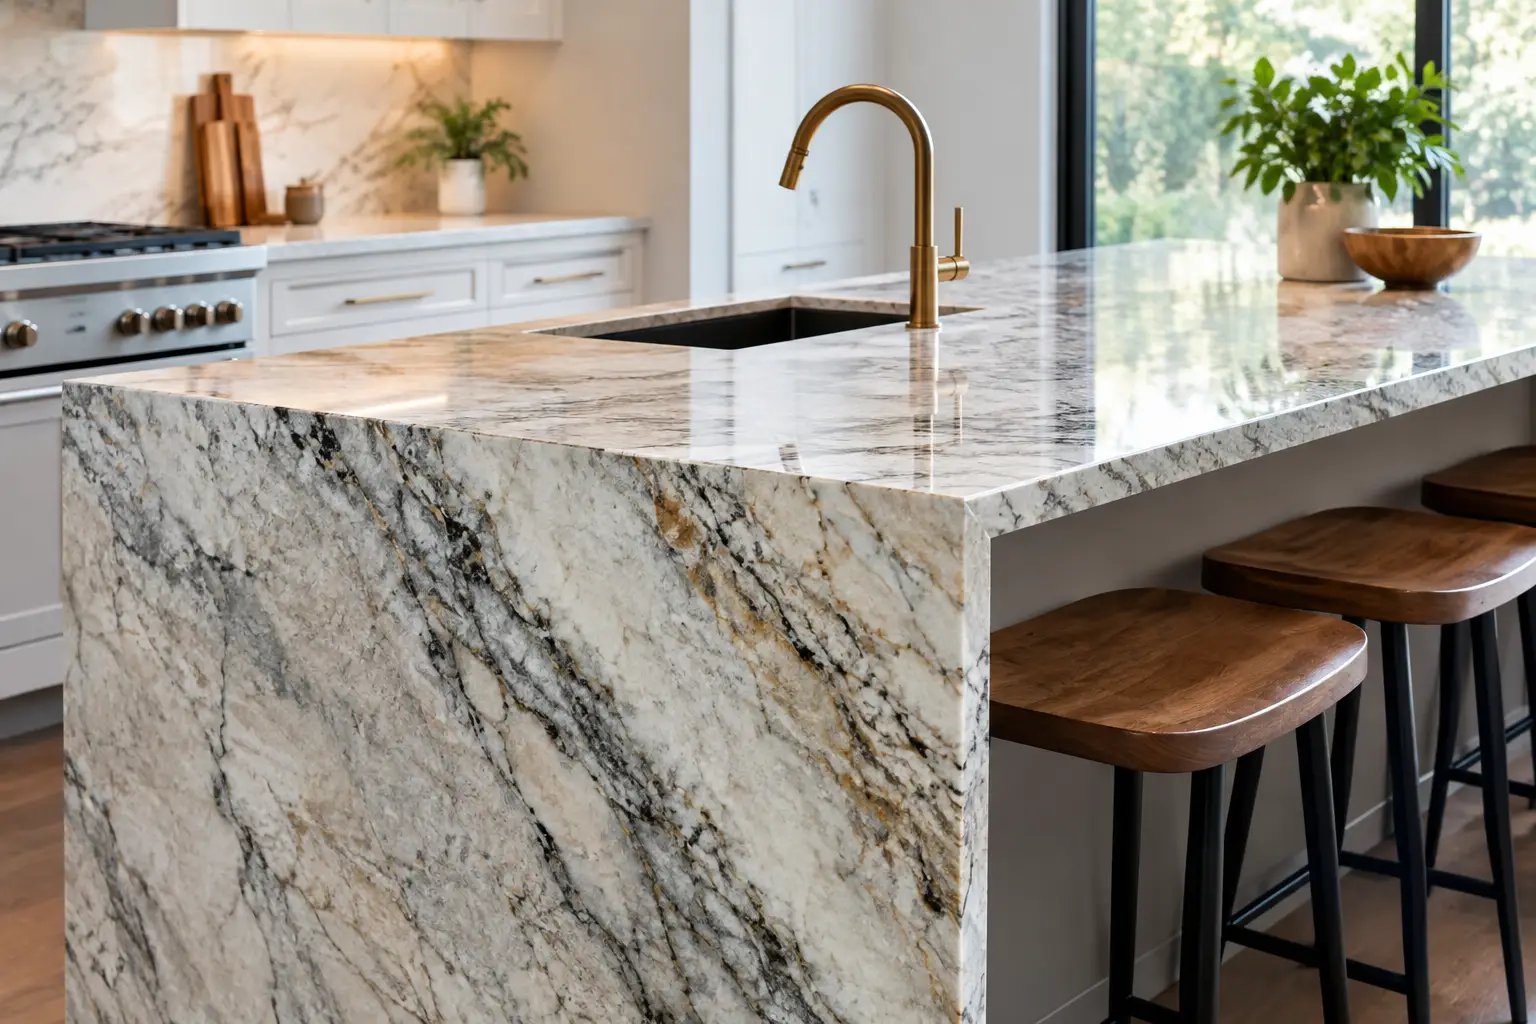
Waterfall kitchen island showing continuous stone veining from the countertop down the side panel

Quick Answer: What Are the Best Stones for Waterfall Islands?

Quartz, quartzite, granite, marble, porcelain, and sintered stone can all work well for waterfall islands. Quartz offers practical, low-maintenance performance. Quartzite combines natural movement with durability, while granite performs well in busy kitchens. Marble provides distinctive natural veining. Porcelain and sintered stone can create a thin, contemporary profile. Your best option depends on maintenance, slab size, pattern, edge construction, and the desired transition across the waterfall corners.

What Makes a Stone Work for a Waterfall Island?

Fabricators commonly join the horizontal countertop to the vertical side panels with a mitered edge. A well-executed miter makes the stone pattern and thickness appear continuous around the corner. Creating that effect requires accurate cutting, polishing, alignment, and support. Even a narrow mismatch can stand out at eye level.

Materials with a consistent background or controlled pattern are generally easier to plan. Dramatic natural veining can look exceptional, but it requires more attention. Before cutting, the fabricator must determine slab orientation and vein direction. The layout should also account for how the pattern will move from the top down each end.

Appearance is only part of the decision. Waterfall ends sit close to foot traffic, stools, pets, and vacuum cleaners. For busy households, resistance to stains, chips, and daily wear can matter as much as the pattern.

Quartz: A Practical Choice for Most Waterfall Islands

Quartz countertops are often one of the best choices for waterfall islands. Quartz combines a predictable appearance with straightforward maintenance. Its nonporous surface does not require sealing. Everyday spills such as coffee, cooking oil, or juice are also unlikely to leave a mark when you clean them promptly.

For a clean, modern island, consider solid white, warm beige, soft grey, or subtle concrete-look quartz. These designs create crisp waterfall panels without forcing the eye to follow a complicated pattern. Fine-veined quartz also suits homeowners who want a marble-inspired appearance with less maintenance.

Heat is the main trade-off. You should not treat quartz as a landing zone for hot cookware. Manufacturers also produce quartz in slabs with repeating or controlled patterns. These designs can appear less organic than natural stone.

That consistency can work in your favour on a waterfall island. It often simplifies the visual transition on long islands or designs with two exposed ends.

Quartzite: Natural Movement With Strong Everyday Performance

Quartzite countertops suit homeowners who want genuine natural stone with movement and crystalline detail. The material can provide more natural variation than engineered quartz while still offering strong everyday performance.

A quartzite waterfall island can range from quiet and sandy to bold and heavily veined. Dramatic slabs deserve careful layout planning. With the right slab, fabricators can align the movement from the countertop into the waterfall panel. This approach creates a deliberate transition instead of a random break at the corner.

Not every quartzite performs exactly the same way. Some varieties are denser and less absorbent than others, and sealing needs can vary. Your fabricator should assess the specific slab rather than relying only on the quartzite label.

Natural fissures and mineral variation are normal characteristics of many quartzites. Reviewing those features before fabrication helps set clear expectations for the finished countertop.

Granite: A Durable Natural-Stone Option

Granite countertops remain a sensible choice for waterfall islands. They suit households that want natural stone with strong heat resistance and reliable everyday performance. Granite also comes in a broad range of colours and patterns. Options range from relatively uniform dark surfaces to slabs with sweeping movement and visible mineral flecks.

A quieter granite can create a tailored island without competing with cabinets or a busy backsplash. More active granite can become the kitchen’s focal point. In that case, slab layout deserves extra attention.

The fabricator may need to adjust the template position to preserve an important feature in the stone. Careful planning can also help the pattern transition more naturally into the waterfall end.

Many granites benefit from periodic sealing, although requirements vary by stone and use. The maintenance is usually manageable. Homeowners who prefer a surface that does not require sealing may find quartz more suitable.

Marble: Beautiful, but Best for a Considered Kitchen

Marble countertops give a waterfall island natural depth and distinctive veining. Engineered surfaces can imitate this appearance, but natural marble has its own variation and character. It works especially well when the island serves as a visual centrepiece.

The practical trade-off is that marble can etch when it comes into contact with acidic ingredients. Lemon juice, vinegar, and wine are common examples. Etching changes the finish rather than necessarily staining the stone, and polished marble often shows it more clearly.

Marble also requires sealing and thoughtful daily care. Those requirements do not rule it out for a waterfall island. They simply make lifestyle and expectations more important.

Homeowners who appreciate a lived-in patina may enjoy marble for many years. If every mark will become frustrating, a marble-look quartz or soft-veined quartzite may be more appropriate.

Porcelain and Sintered Stone: Slim, Contemporary, and Heat-Friendly

Porcelain countertops and sintered stone are strong options for contemporary waterfall islands. They work particularly well when you want a thinner profile or a large-format surface with a controlled pattern. Both materials resist stains well and generally handle heat effectively.

Thin slabs can create a sharp, refined appearance, but fabrication requires specialized handling. Fabricators must cut corners, cutouts, and mitered edges precisely to reduce chipping. Accurate alignment also helps create a convincing wrapped edge.

Installation planning matters just as much. The waterfall panels need proper alignment and support throughout the installation.

Porcelain and sintered surfaces can reproduce marble, concrete, metal, and other stone looks with impressive consistency. This control can help when directional veining needs to travel across a long island and down both ends.

For a closer look at their differences, read our guide to sintered stone vs porcelain countertops.

Vein Matching Matters More Than Most Homeowners Expect

The defining detail of a waterfall island is the point where the countertop turns downward. Veined materials make this transition particularly noticeable. A basic miter can place the side-panel pattern beside the countertop pattern. More detailed layout planning can make the movement appear to continue around the corner.

Achieving a continuous look may require a larger slab, different slab orientation, or extra material. These requirements can increase the project cost. On a feature island facing the main living area, however, careful pattern planning can make a noticeable visual difference.

Subtle quartz, quieter granite, and solid colours may not need the same level of matching. Strongly veined materials usually benefit from more detailed planning.

Ask to review the slab layout before cutting if your chosen material has prominent veins or large mineral movement. The same advice applies to surfaces with a distinct directional pattern. Our guide on how to match countertop veining explains why slab orientation and cutting decisions matter before fabrication begins.

Thickness, Edges, and Seams

Many waterfall islands use 2 cm or 3 cm countertop material. Fabricators can use a mitered build-up with some 2 cm materials to create a thicker-looking profile. A 3 cm slab naturally creates more visual weight. Material type, cabinet design, fabrication method, and desired proportions should guide the choice.

Most waterfall designs use a simple eased edge or clean mitered corner rather than an elaborate decorative profile. Detailed edge profiles can distract from the vertical drop. Some profiles also do not transition naturally around a waterfall miter.

A lightly softened edge is often enough to make the surface comfortable while preserving the island’s clean lines.

Seam placement also deserves early planning. A large island may require more than one slab, and some patterns hide seams more successfully than others. When possible, the layout may keep seams away from prominent areas such as the main seating zone. Sink and cooktop locations can also affect seam planning.

The final seam position depends on slab dimensions, pattern layout, fabrication requirements, and safe installation.

Waterfall Islands Need Proper Support

The waterfall panels form only one part of the island’s structural plan. Seating overhangs, sink openings, cooktops, cabinet construction, and material weight can all affect support requirements.

A thick-looking mitered edge does not automatically mean the countertop can handle a large unsupported span. Visual thickness and structural support are separate considerations. Overhang depth, cabinet construction, stone type, and cutout locations should all receive attention before fabrication.

If your design includes seating, read our countertop overhang support guide. It explains the factors that determine when additional support may be appropriate.

Choose for Your Kitchen, Not Just the Showroom Sample

A small sample cannot show how a full slab will look when it wraps down one or both sides of an island. Whenever possible, view the actual slab before making the final decision. Discuss which faces of the finished island will remain exposed.

Look at the cabinets, flooring, backsplash, lighting, and stool placement as part of the same design. A bold pattern can look striking in a bright, open kitchen. It may feel busier when several surrounding finishes also demand attention.

Function matters too. If stools tuck beneath the island, waterfall panels affect where the seating overhang begins and where people can comfortably place their feet. The design needs to balance seating space with proper countertop support.

Confirm sink cutouts, cooktops, large overhangs, and waterfall dimensions during templating. Resolving these details before fabrication reduces the chance of surprises after cutting begins.

For homeowners in Ontario planning a custom island, Stone Valley Countertops can help compare the actual slab, edge approach, vein direction, and layout before fabrication. The best result is rarely about choosing the most expensive stone. It comes from selecting a material that suits daily use and planning the fabrication details carefully.

A well-chosen waterfall island should still feel right after the first busy dinner, first spill, and years of regular use. Start with a material you will be comfortable living with. Then let careful slab layout and precise fabrication create the visual impact.

Frequently Asked Questions About Waterfall Island Countertops

What is the best stone for a waterfall kitchen island?

There is no single best material for every waterfall island. Quartz offers easy maintenance, while quartzite provides natural movement and strong everyday performance. Granite offers durability and heat resistance. Marble provides distinctive natural character, while porcelain and sintered stone can create a slim contemporary appearance. Your kitchen, maintenance expectations, slab layout, and design preferences should guide the decision.

Is quartz good for a waterfall island?

Yes. Quartz works particularly well for waterfall islands because its relatively consistent pattern can simplify the transition between the countertop and vertical panels. The nonporous surface also does not require sealing. Highly veined quartz still needs careful slab planning when you want the pattern to flow across the corner.

Can you vein-match a waterfall countertop?

Yes, depending on the slab, pattern, dimensions, and available material. Fabricators can plan cuts so prominent veins appear to continue from the horizontal countertop into the waterfall panel. Complex matching may require extra material or a specific slab orientation.

Does a waterfall countertop need a mitered edge?

Fabricators commonly use a mitered joint to create a clean transition between the horizontal countertop and vertical waterfall panel. The exact construction depends on the material, thickness, design, and fabrication requirements.

Are waterfall islands more expensive than standard islands?

Waterfall islands generally require more countertop material because the design includes one or two vertical panels. Mitering, vein matching, slab layout, handling, and installation can add labour as well. The final cost depends on the material, island dimensions, number of waterfall ends, and fabrication complexity.

Should I choose the slab before planning the waterfall layout?

For natural stone and strongly veined engineered surfaces, reviewing the actual slab before finalizing the layout is useful. Slab dimensions, vein direction, natural features, and cutout locations can influence the final pattern. They can also determine whether the desired movement can continue from the top into the waterfall ends.

Planning a Waterfall Island in Ontario?

If you are comparing materials for a new waterfall island, bring your kitchen measurements, cabinet plans, or inspiration photos when reviewing slabs. Stone Valley Countertops can help evaluate slab dimensions, veining, seams, edge construction, and waterfall-panel placement before fabrication begins.

Visit one of our Ontario showrooms or contact Stone Valley Countertops to discuss your project.

Marble Countertops: Timeless Beauty & Everything You Need to Know

Why Marble is Still One of the Most Elegant Countertop Choices

Marble countertops have been a symbol of luxury, elegance, and sophistication for centuries. Whether you’re renovating your kitchen, bathroom, or a commercial space, marble offers a unique aesthetic that few materials can match.

But is marble worth the investment? Let’s explore the pros, cons, costs, and maintenance so you can decide if marble is the right choice for your home.


Understanding the Unmatched Appeal of Marble

Marble is a natural stone known for its unique veining and smooth finish. Each slab is one-of-a-kind, making it a preferred choice for high-end kitchen designs.

Some of the most popular marble varieties include:

  • Carrara Marble – Classic soft gray veining, budget-friendly option

  • Calacatta Marble – Bold, dramatic veining with a premium look

  • Statuario Marble – Rare, bright white stone with striking contrast


Pros & Cons of Marble Countertops

Feature Pros 🟒 Cons πŸ”΄
Aesthetic Appeal Timeless, elegant look Requires sealing to maintain appearance
Heat Resistance Naturally cool for baking Can scorch if exposed to extreme heat
Durability Lasts for decades with proper care Softer than granite or quartz
Maintenance Easy to clean Prone to stains from acidic foods
Cost Wide price range to fit different budgets High-end varieties can be expensive

How Much Do Marble Countertops Cost?

Marble countertops can range in price based on the type, thickness, and quality of the slab.

πŸ”Ή Carrara Marble – $40 to $100 per sq. ft. (affordable & classic)
πŸ”Ή Calacatta Marble – $100 to $250 per sq. ft. (luxury look, premium price)
πŸ”Ή Statuario Marble – $150 to $300 per sq. ft. (high-end, rare stone)

πŸ’‘ Pro Tip: Installation costs vary based on the edge profile, sealing, and customization.


Marble vs. Other Countertops: How Does It Compare?

Feature Marble Granite Quartz
Natural Stone βœ… Yes βœ… Yes ❌ No
Heat Resistance βœ… Yes βœ… Yes 🚫 No
Scratch Resistance 🚫 No βœ… Yes βœ… Yes
Stain Resistance 🚫 No βœ… Yes βœ… Yes
Maintenance Required βœ… Yes (Sealing Needed) βœ… Yes (Less Frequent) 🚫 No

Verdict: If you love the classic, natural beauty of stone and don’t mind some maintenance, marble is a stunning choice.


How to Maintain Marble Countertops

Since marble is a porous stone, it requires some care to keep it looking its best.

Seal Your Countertops – Prevent stains by sealing marble every 6–12 months
Use pH-Neutral Cleaners – Avoid acidic cleaners that can etch the surface
Wipe Spills Immediately – Especially with wine, citrus, and coffee
Use Cutting Boards & Trivets – Protect against scratches and heat damage

Want a full maintenance guide? Check out How to Maintain Your Countertops for a Lifetime.


Is Marble Right for Your Home?

Best for:

  • Homeowners who love luxury and timeless beauty

  • Kitchens where baking is common (naturally cool surface)

  • Elegant bathrooms and high-end designs

Consider Alternatives If:

  • You don’t want to reseal or maintain your countertops

  • You prefer stain and scratch-resistant materials like quartz

  • You have a high-traffic kitchen that needs heavy durability


Final Thoughts on Marble Countertops

Marble countertops are stunning, luxurious, and timelessβ€”but they do require proper care to maintain their beauty.

If you’re considering marble for your kitchen or bathroom, make sure you choose the right type, seal it properly, and clean it regularly for long-lasting beauty.

Thinking about upgrading to marble? Contact us for a consultation!

Trending Countertop Colors & Patterns for Modern Kitchens

Choosing the right trending countertop colors & patterns can completely transform your kitchen. In 2025, modern kitchens are embracing bold veining, warm neutrals, and rich, earthy tones to create a fresh and stylish look.

From warm neutrals to bold veining patterns, 2025 is all about mixing natural beauty with modern aesthetics. In this guide, we’ll explore the top countertop colors and patterns that are dominating modern kitchens this year.

πŸ’‘ Looking for more countertop inspiration? Check out our guide on Types of Countertops: Discover the Best Materials for Your Home.


Top Trending Countertop Colors & Patterns in 2025

From warm neutrals to bold veining patterns, 2025 is all about mixing natural beauty with modern aesthetics. In this guide, we’ll explore the top countertop colors and patterns that are dominating modern kitchens this year.


1. Neutral Tones with Warm Undertones

Neutral countertops are still a top choice, but in 2025, they’re leaning warmer and richer. Instead of cool-toned whites and grays, we’re seeing an increase in beige, taupe, and creamy off-whites that bring warmth to modern kitchens.

Best Materials for Warm Neutrals:

  • Quartz – Offers a consistent, non-porous surface in warm shades.
  • Marble – Classic choice with soft veining and creamy tones.
  • Granite – Natural variation with warm undertones.

πŸ’‘ Pairing Tip: Warm neutral countertops look best with earthy cabinets like oak, walnut, or sage green.


2. Bold Veining & Statement Patterns

Subtle countertops are taking a backseat to bold, high-contrast veining. Large, dramatic patterns inspired by natural stone create a luxurious, eye-catching effect.

Trending Statement Countertops:

  • Calacatta Quartz & Marble – White base with thick, dramatic gray or gold veining.
  • Quartzite with Unique Veins – Natural movement and striking patterns.
  • Soapstone – Darker stone with subtle white veining for a moody aesthetic.

πŸ’‘ Pairing Tip: Let bold countertops be the focal point by pairing them with sleek, minimalist cabinets and backsplashes.


3. Dark & Moody Countertops

Dark kitchen designs are making a strong comeback, with deep charcoal, black, and navy countertops leading the way. These colors add a sleek, modern feel and pair beautifully with both light and dark cabinetry.

Best Materials for Dark Countertops:

  • Black Granite – Durable and naturally resistant to scratches.
  • Honed Black Quartz – Matte finish with a sophisticated touch.
  • Soapstone – A deep, rich look that develops character over time.

πŸ’‘ Pairing Tip: For balance, combine dark countertops with light wood cabinetry or brushed gold hardware.


4. Soft & Muted Greens

Green has become a go-to color for modern kitchens, with soft, muted shades appearing in countertops as well. These earthy tones add a calming, nature-inspired feel to any space.

Popular Green Countertop Materials:

  • Quartzite in Sage or Olive Tones – Subtle green hues with natural veining.
  • Marble with Green Veins – White marble featuring light green streaks.
  • Recycled Glass Countertops – Eco-friendly and available in soft green shades.

πŸ’‘ Pairing Tip: Green countertops look best with warm wood cabinets, matte black fixtures, and brass accents.


5. Textured & Matte Finishes

Glossy, polished countertops are being replaced by honed, leathered, and matte finishes. These textures offer a modern, low-maintenance look while reducing glare.

Top Textured Countertop Options:

  • Honed Quartz – A smooth, matte surface that resists fingerprints.
  • Leathered Granite – Adds dimension and hides smudges better than polished granite.
  • Concrete Countertops – Industrial style with a soft, natural feel.

πŸ’‘ Pairing Tip: Matte countertops work best in minimalist, Scandinavian-inspired kitchens with open shelving and natural elements.


Which Countertop Color & Pattern is Right for You?

  • Choose Warm Neutrals if you want a classic, timeless look.
  • Choose Bold Veining for a luxurious, statement-making kitchen.
  • Choose Dark & Moody Tones for a modern, dramatic feel.
  • Choose Muted Green to add earthy elegance and natural beauty.
  • Choose Textured Finishes for a sleek, low-maintenance option.

Final Thoughts

Keeping up with countertop trends is a great way to refresh your kitchen’s design. Whether you love bold veining, deep moody tones, or soft neutrals, the right countertop choice will bring long-lasting beauty and functionality to your space.

πŸ’‘ Still deciding on the best countertop for your home? Check out our guide on Types of Countertops: Discover the Best Materials for Your Home.

Need expert advice? Fill out our quote request form for professional countertop recommendations!

Best Kitchen & Bathroom Countertops – Top Choices & Benefits

Best Kitchen & Bathroom Countertops – Top Choices & Benefits

Choosing the best kitchen & bathroom countertops is an important decision for any home. The right surface enhances aesthetics, functionality, and durability. However, with so many options available, selecting the perfect material can feel overwhelming.

πŸ’‘ Not sure where to start? Check out our guide on Types of Countertops: Discover the Best Materials for Your Home.

This guide compares popular countertop materials, highlighting their benefits and drawbacks to help you make the best choice.


Key Factors to Consider

When choosing a countertop, it’s essential to evaluate a few key factors:

Can it withstand daily use? Durability plays a major role in ensuring your countertop lasts for years.

Does it require sealing or special care? Some materials need regular maintenance, while others are hassle-free.

Will it complement your home’s style? The aesthetic appeal of a countertop should match your kitchen or bathroom design.

What is your budget? Prices vary widely, so consider the best option within your price range.

Will it add to your home’s value? Certain materials, like quartzite and granite, can enhance resale value.

Each material offers unique advantages. Therefore, considering these factors will ensure you make an informed decision.


Best Kitchen & Bathroom Countertops – Material Comparison

1. Quartz Countertops

Why Choose Quartz?

  • βœ… Low Maintenance – No sealing required.
  • βœ… Non-Porous – Resistant to stains and bacteria.
  • βœ… Versatile Design Options – Available in various colors and patterns.

⚠ Potential Downsides:

  • Less heat-resistant than natural stone.
  • Prolonged sun exposure may cause discoloration.

πŸ’° Average Cost: $50 – $120 per sq. ft.


2. Granite Countertops

Why Choose Granite?

  • βœ… Highly Durable – Scratch and heat-resistant.
  • βœ… Distinctive Natural Patterns – No two slabs are alike.
  • βœ… Boosts Home Value – A premium choice for resale.

⚠ Potential Downsides:

  • Requires sealing to prevent stains.
  • Fewer color choices compared to engineered options.

πŸ’° Average Cost: $40 – $100 per sq. ft.


3. Quartzite Countertops

Why Choose Quartzite?

  • βœ… Extremely Hard & Scratch-Resistant – Tougher than granite.
  • βœ… Excellent Heat Resistance – Ideal for kitchens.
  • βœ… Natural Marble-Like Appearance – Luxury look with durability.

⚠ Potential Downsides:

  • Requires periodic sealing.
  • More expensive than quartz and granite.

πŸ’° Average Cost: $80 – $200 per sq. ft.


4. Marble Countertops

Why Choose Marble?

  • βœ… Timeless Elegance – Adds a luxurious feel to any space.
  • βœ… Naturally Cool Surface – Ideal for baking and pastry-making.

⚠ Potential Downsides:

  • Prone to scratches and stains.
  • Requires frequent maintenance.

πŸ’° Average Cost: $60 – $180 per sq. ft.


5. Solid Surface Countertops (Corian, etc.)

Why Choose Solid Surface?

  • βœ… Seamless & Repairable – Scratches can be buffed out easily.
  • βœ… Variety of Color Options – Works with modern designs.

⚠ Potential Downsides:

  • Less heat-resistant than stone.
  • Can scratch if not maintained properly.

πŸ’° Average Cost: $40 – $80 per sq. ft.


Best Kitchen & Bathroom Countertops – Cost Comparison

Here’s a general price comparison of countertop materials:

Countertop Material Average Cost (Per Sq. Ft.)
Quartz $50 – $120
Granite $40 – $100
Quartzite $80 – $200
Marble $60 – $180
Solid Surface $40 – $80

Quartzite and marble are premium choices, while granite and solid surface countertops are more budget-friendly.


Which Kitchen & Bathroom Countertop is Right for You?

  • Choose Quartz for a low-maintenance, stain-resistant option.
  • Choose Granite for a natural stone that’s heat- and scratch-resistant.
  • Choose Quartzite for luxury and extreme durability.
  • Choose Marble for elegance with high maintenance requirements.
  • Choose Solid Surface for a budget-friendly, seamless appearance.

Since every home has different needs, selecting the right countertop depends on your lifestyle, budget, and style preference.


Final Thoughts

Selecting the best kitchen & bathroom countertops requires balancing durability, maintenance, cost, and design. Whether you prefer the versatility of quartz, the natural beauty of granite, or the luxury of marble, there’s a perfect option for you.

πŸ’‘ Still deciding? Check out our guide on Types of Countertops: Discover the Best Materials for Your Home.

Need expert guidance? Fill out our quote request form to get tailored recommendations!


Your Thoughts?

Looking for the perfect countertop? Fill out our quote request form to get a personalized estimate and expert recommendations! πŸš€

Need expert advice? Fill out our quote request form to find the perfect countertop for your home!


Your Thoughts?

Looking for the perfect countertop? Fill out our quote request form to get a personalized estimate and expert recommendations! πŸš€

Professional Countertop Installation – Why You Need It

Professional Countertop Installation Guide

A countertop may look straightforward once it is sitting on the cabinets, but a successful installation depends on many details that homeowners rarely see. Cabinet levelling, slab layout, seam placement, sink support, appliance clearances, wall conditions, overhangs, and access through the home all affect the finished result.

Professional countertop installation brings those details together after the material has been selected and fabricated. The goal is not only to place the stone on the cabinets. It is to make sure each piece fits properly, remains supported, aligns with adjoining sections, and works with the sink, cooktop, backsplash, and surrounding cabinetry.

Quick answer: Professional countertop installation is important because quartz, granite, marble, quartzite, porcelain, and sintered stone are heavy, rigid materials that require accurate measurements and controlled handling. Installers check cabinet support, position seams, secure sinks, level adjoining pieces, and seal the necessary joints. Good installation helps reduce the risk of cracks, poor-fitting seams, unsupported overhangs, water entry, and costly corrections after the countertop is in place.

Why Professional Countertop Installation Matters

Countertops are fabricated to fit a specific room. Even when cabinets appear straight, walls may bow, corners may be out of square, and appliance openings may differ slightly from the original plans. These variations are common in both older Ontario homes and newly built kitchens.

A professional installation accounts for the actual site conditions. Installers compare the fabricated pieces with the cabinets, walls, cutouts, and appliances before final placement. They also check whether the pieces can be carried safely through doors, hallways, stairs, elevators, and tight kitchen openings.

This is especially important with large islands, full-height backsplashes, waterfall panels, long countertop runs, and natural stone slabs with veining that must align across separate pieces.

Professional Installation Starts Before Installation Day

The quality of the installation is closely connected to the work completed before the crew arrives. Countertop projects generally move through material selection, site measurement or digital templating, slab layout, fabrication, and installation.

Our guide to countertop fabrication in Ontario explains how measurements, cutouts, edges, seams, and slab planning are handled before the material reaches the home.

Cabinets Must Be Installed and Secure

Base cabinets should be fully installed, fastened together, and secured to the wall before countertop templating. They should also be level across the full kitchen, not simply within each individual cabinet.

Stone countertops can follow minor variations, but they should not be expected to correct significant cabinet problems. An uneven cabinet run may create inconsistent joints, poor contact, stress within the slab, or alignment problems around appliances.

Any decorative panels, finished ends, support walls, appliance panels, or island legs that affect the countertop dimensions should also be in their final positions before measurements are taken.

Sinks and Appliances Must Be Confirmed

The exact sink, cooktop, faucet, and other built-in components should be selected before fabrication. Model numbers alone are not always enough because cutout requirements can vary between similar products.

For undermount sinks, the fabricator needs the actual sink or an approved manufacturer template. Cooktop clearances, corner radiuses, reveal preferences, faucet holes, soap dispensers, and accessory openings should be confirmed before cutting begins.

Seams Should Be Planned Early

A seam is not automatically a sign of poor workmanship. It may be necessary because of slab size, kitchen layout, access limitations, pattern direction, or the risk of moving an oversized piece.

The best seam location balances appearance, structural handling, cabinet support, sink and cooktop positions, and installation access. You can learn more in our kitchen countertop seams guide.

What Happens on Countertop Installation Day?

The exact process varies by project, but most installations follow a similar sequence.

The Installation Area Is Reviewed

Before bringing in the slabs, the crew confirms that the cabinets, walls, plumbing area, appliances, and access route match the information used during fabrication.

If a cabinet has moved, an appliance opening has changed, or another trade has altered the site after templating, the countertop may no longer fit as intended. Identifying those changes before setting the stone can prevent damage and unnecessary adjustments.

The Pieces Are Carried Into Position

Fabricated countertop pieces can be extremely heavy and may contain vulnerable areas around sink and cooktop cutouts. Installers use appropriate lifting equipment and coordinated handling methods to move each section into the room.

The path from the truck to the kitchen matters. Door widths, steps, railings, ceiling height, flooring, weather, elevator access, and tight turns can all influence how a piece is carried and whether additional planning is required.

Each Piece Is Dry-Fitted

Before final fastening or adhesive is applied, the countertop is placed on the cabinets to verify the fit. Installers check wall gaps, overhangs, appliance openings, cabinet contact, seam alignment, and the relationship between adjoining pieces.

Walls are rarely perfectly straight. Small gaps along the back wall are often covered by a backsplash, stone upstand, or appropriate finishing detail. Larger irregularities may require discussion before the installation can be completed properly.

The Countertop Is Levelled and Secured

Installers check that adjoining pieces sit at the correct height and that the countertop is supported by the cabinets below. Small adjustments may be made where appropriate to create consistent contact and alignment.

The method used to secure the countertop depends on the material, cabinet construction, project design, and manufacturer requirements. Stone should not be forced into position to compensate for major cabinet or wall issues.

Seams Are Joined

Where a seam is required, the two sections are brought together, levelled, and bonded with a colour-matched adhesive. The goal is to create a strong joint with consistent height and the best practical visual match.

Even a well-made seam is usually visible at close range. Its appearance depends on the stone pattern, colour, finish, lighting, edge alignment, and location. Bold veins and directional patterns require particularly careful slab planning.

The Sink Is Mounted

For an undermount sink, the installer positions and secures the sink below the countertop opening. The sink should have suitable mechanical support rather than relying only on adhesive.

Plumbing is normally reconnected after the countertop installation, often by a plumber. Homeowners should confirm who is responsible for disconnecting and reconnecting the faucet, drain, dishwasher, garburator, and other plumbing components before installation day.

Final Joints Are Sealed

Appropriate silicone is commonly applied at the sink, wall, backsplash, or countertop joints where moisture control and movement accommodation are needed.

Natural stone may also require sealing depending on the material. Engineered quartz does not normally require a penetrating sealer, while granite, marble, and quartzite requirements can vary by slab.

Common Problems Professional Installation Helps Prevent

Poorly Supported Countertops

Stone needs consistent cabinet support. Gaps, weak cabinet sections, missing support panels, or improperly planned overhangs can place unnecessary stress on the material.

Large seating overhangs, raised bars, floating sections, and dishwasher openings may require brackets, steel supports, legs, or other reinforcement. The required support depends on the slab thickness, material, projection, cabinet design, and manufacturer guidance.

Uneven Seams

A seam can become more noticeable when adjoining pieces are not level, the cabinets below are uneven, the pattern has not been planned, or the joint is placed in a visually prominent location.

Professional seam preparation focuses on edge quality, alignment, colour matching, and proper support below the joint.

Sink Movement or Failure

An undermount sink filled with water, cookware, or dishes places significant load below the countertop. Proper support helps prevent the sink from separating from the stone over time.

The sink cabinet must also provide enough room for mounting hardware, plumbing, faucet connections, and any accessories installed below the counter.

Incorrect Appliance Openings

Ranges, cooktops, refrigerators, and dishwashers all require adequate clearances. An opening that is too narrow may prevent an appliance from fitting, while an oversized opening can leave unwanted gaps.

Installation planning should also consider countertop projection, control access, ventilation requirements, and whether the appliance must be moved for future servicing.

Cracks Around Cutouts

Sink and cooktop openings reduce the amount of material connecting sections of a slab. These areas require careful fabrication, handling, support, and installation.

Natural fissures, internal stresses, transportation conditions, cabinet movement, and unsupported areas can also affect certain materials. Proper installation reduces avoidable stress but cannot make stone indestructible.

Water Entry at Joints

Water can enter around sinks, faucets, backsplashes, seams, and wall joints when the required sealing is incomplete or deteriorates over time.

Homeowners should periodically inspect silicone joints and arrange for replacement when they begin to separate, crack, or show signs of wear.

Installation Considerations by Countertop Material

Quartz

Quartz offers consistent patterns, low routine maintenance, and strong stain resistance. It is rigid and heavy, and cutouts need accurate fabrication and controlled handling.

Quartz is heat resistant but not heatproof. Appliance clearances and direct heat exposure should be reviewed, particularly around high-output cooking equipment. Our article on whether quartz countertops are heat resistant explains this limitation in more detail.

Granite

Granite is durable and handles normal kitchen heat well, but each slab contains natural variation. Veins, mineral deposits, fissures, and colour movement should be considered during slab layout.

Some granite requires periodic sealing. The need depends on the specific stone rather than the material name alone.

Marble

Marble is softer and more sensitive to acids than granite or quartzite. It requires careful handling and realistic expectations around etching, staining, and natural ageing.

Seam placement and slab matching are especially important with strongly veined marble because pattern movement can make a joint more noticeable.

Quartzite

True quartzite is generally hard and durable, but individual slabs vary in porosity, fissures, resin treatment, and structure. Fabrication and installation decisions should be based on the selected slab.

Large quartzite pieces can be challenging to handle, particularly where there are sink cutouts, narrow rails, or complex veining.

Porcelain and Sintered Stone

Porcelain, Dekton, and other sintered surfaces provide strong heat and UV performance, but thinner slabs and exposed edges require specialized fabrication and handling.

Edge design, mitred build-ups, cabinet support, and installation access should be planned before fabrication. These materials should be handled by teams familiar with the specific product.

How Long Does Countertop Installation Take?

Many standard countertop installations can be completed in one day. Larger or more detailed projects may take longer.

The schedule can be affected by:

  • The number and size of countertop pieces
  • Access to the kitchen
  • The number of seams and cutouts
  • Full-height backsplash installation
  • Waterfall panels or mitred edges
  • Wall irregularities or cabinet issues
  • Removal of existing countertops
  • Plumbing and appliance coordination

Installation time is only one part of the full process. Templating, slab approval, fabrication, scheduling, and any required site preparation happen before the crew arrives.

How Homeowners Should Prepare

Good preparation makes the installation safer and more efficient.

  • Clear countertops, drawers, and nearby work areas.
  • Remove fragile items from adjoining rooms and open shelves.
  • Confirm that plumbing and appliances have been disconnected when required.
  • Keep children and pets away from the installation area.
  • Provide a clear route from the entrance to the kitchen.
  • Reserve elevator access in condominiums when necessary.
  • Confirm parking and loading arrangements.
  • Make sure an authorized person is available to review the completed work.

Some dust, noise, and minor on-site adjustment may occur. Most cutting should be completed during fabrication, but small installation adjustments can occasionally be necessary.

What Should You Inspect After Installation?

Before the crew leaves, walk through the project and review the main details.

  • Confirm the countertop sits securely on the cabinets.
  • Review seam locations and height alignment.
  • Check countertop overhangs and exposed ends.
  • Inspect sink positioning and support.
  • Confirm faucet and accessory holes are present.
  • Check appliance openings and clearances.
  • Review wall and backsplash joints.
  • Ask about cleaning, sealing, and care instructions.

Natural stone contains variation that should not be confused with installation defects. Veins, pits, fissures, mineral deposits, and colour changes may be part of the selected slab. These characteristics are best reviewed before fabrication so expectations are clear.

Professional Installation Versus DIY Installation

Installing laminate or certain wood countertops can be manageable for an experienced homeowner. Slab quartz, granite, marble, quartzite, porcelain, and sintered stone are different.

These materials require specialized measuring, cutting, polishing, transportation, lifting, seam bonding, sink mounting, and support planning. Mistakes can damage the countertop, cabinets, walls, flooring, plumbing fixtures, or appliances.

A slab may also fit through the kitchen layout on paper but be impossible to carry through a stairwell, hallway, or doorway. Professional installers account for these access limitations before the pieces are fabricated.

For these reasons, slab countertop installation should be completed by an experienced fabrication and installation team rather than treated as a typical weekend renovation project.

Frequently Asked Questions

Do Cabinets Need to Be Level Before Countertop Installation?

Yes. Cabinets should be fully installed, securely fastened, and level before templating and installation. Significant cabinet corrections should be completed by the cabinet installer before the countertop is placed.

Are Countertop Seams Always Visible?

Most seams can be seen at close range. A professional installation aims to keep the pieces level, create a tight joint, use a suitable adhesive colour, and place the seam thoughtfully. Complete invisibility should not be promised.

Who Connects the Plumbing After Installation?

Plumbing connections are usually completed by a plumber after the countertop and sink are installed. Confirm responsibilities before installation day because the countertop installer may not reconnect faucets, drains, dishwashers, or garburators.

Can Countertops Be Installed on Uneven Cabinets?

Minor adjustments may sometimes be possible, but countertops should not be used to correct significant cabinet problems. Uneven cabinets can affect seams, support, appliance openings, and the long-term performance of the countertop.

Can I Use My Kitchen Immediately After Installation?

The countertop itself may be ready for light use shortly after installation, but adhesives and silicone may require curing time. Plumbing should not be used until the sink, drain, and faucet have been properly connected and the relevant sealants have cured.

Does Professional Installation Include Countertop Removal?

Not always. Existing countertop removal, disposal, plumbing, appliance disconnection, drywall repair, and cabinet modifications may be separate services. These items should be confirmed in the project scope before work begins.

How Much Overhang Can a Countertop Have Without Support?

The answer depends on the material, thickness, cabinet construction, total slab dimensions, and manufacturer guidance. Seating overhangs and extended sections should be reviewed during planning rather than relying on one general measurement for every material.

Should Countertops Be Installed Before the Backsplash?

Yes. Countertops are normally installed before tile or full-height slab backsplashes. This allows the backsplash to fit the final countertop position and creates a cleaner joint between the two surfaces.

Plan the Installation Before the Stone Is Cut

The best countertop installations begin with clear decisions before fabrication. Material selection, slab layout, seams, edge profiles, sink mounting, appliance openings, overhang support, wall conditions, and site access should all be reviewed early.

Professional countertop installation does not eliminate every visible seam or natural material variation. It does, however, help ensure the countertop fits the room, remains properly supported, works with the surrounding fixtures, and performs as intended in daily use.

Stone Valley Countertops supplies, fabricates, and installs quartz, granite, marble, quartzite, porcelain, Dekton, and other countertop surfaces across Mississauga, Toronto, the GTA, Durham Region, Niagara Region, Hamilton, Burlington, Oakville, and surrounding Ontario communities.

To discuss your kitchen, bathroom, fireplace, laundry room, or commercial countertop project, contact Stone Valley Countertops. Our team can review your measurements, material choice, sink details, edge profile, seam plan, and installation requirements before fabrication begins.